Manipulating your model
Overview
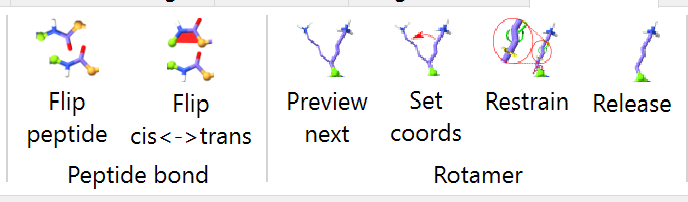
Where simple tugging on atoms is insufficient to solve problems with your model, ISOLDE provides various tools to help. Some of the most commonly used live up on the ribbon menu:
... while the remainder are found in ISOLDE’s Restraints tab. Let’s start with the ribbon menu buttons.
Peptide flip and rotamer adjustment buttons
The two “Flip” buttons will become active when you select a single amino acid residue that isn’t at the N-terminus of a fragment (that is, has another amino acid bonded to its backbone nitrogen). The “Flip peptide” button uses temporary torsion restraints on phi and psi to (attempt to) flip the N-terminal peptide bond by 180 degrees. The “Flip cis<->trans” button, meanwhile, flips the target of the always-present restraint on omega to switch from cis to trans or vice versa. If no simulation is running, a small local one will be automatically started to do the job.
The “Preview next” rotamer button, meanwhile, becomes active whenever you select a single rotameric amino acid residue. Clicking it once will create a preview of the most common rotamer for that residue, overlaid on the model with a label giving its name and prevalence. Clicking again will give the next most common residue and so on:
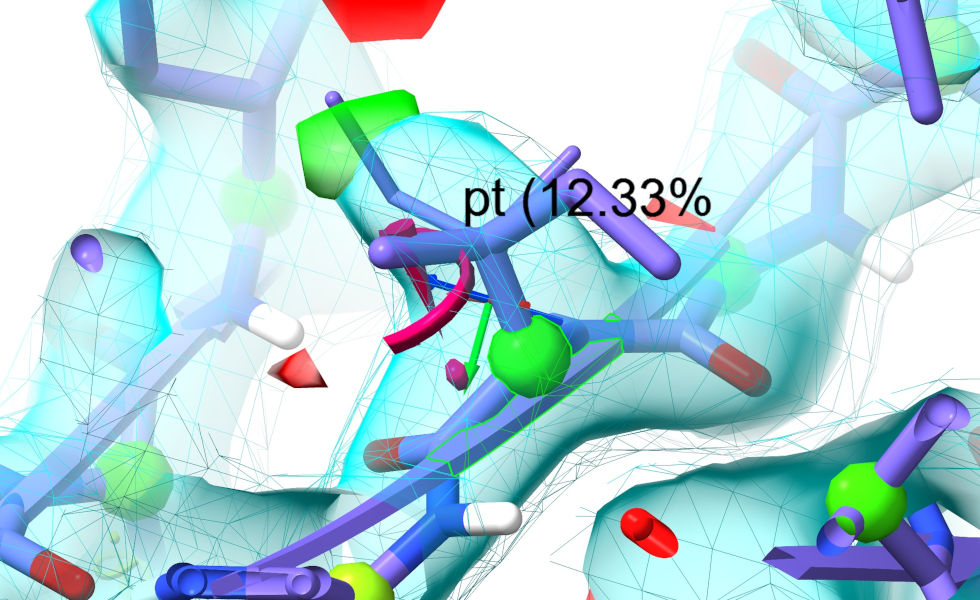
When you have found what you believe to be the most suitable rotamer, you have two choices:
click the “Set coords” button to tell ISOLDE to simply set the model coordinates to match the preview. If a simulation is running, this will automatically trigger a quick energy minimisation before continuing. (Do NOT use this option if the preview coordinates clash severely with surrounding atoms. Instead, use option b)
click the “Restrain” button to add torsion restraints forcing the sidechain chi torsions to match the preview. This approach is “safe” in that it will never introduce severe clashes - but bulky sidechains will usually need a little help via mouse tugging to make large changes.
All user-applied dihedral restraints (other than the always-on restraints on the peptide bond omega dihedrals) are displayed on the model using a ring-and-post motif as shown for this lysine rotamer:
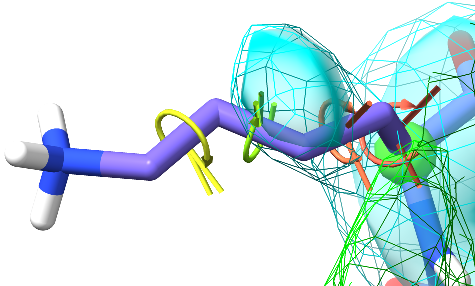
The difference between the current dihedral angle and the target is indicated by the angle between the posts, and the level of satisfaction of the restraints is further indicated by colour. The thickness of each indicator is proportional to the strength of the restraint.
The final button (“Release”) can be used to disable any torsion restraints added by choosing option (b).
The Restraints tab
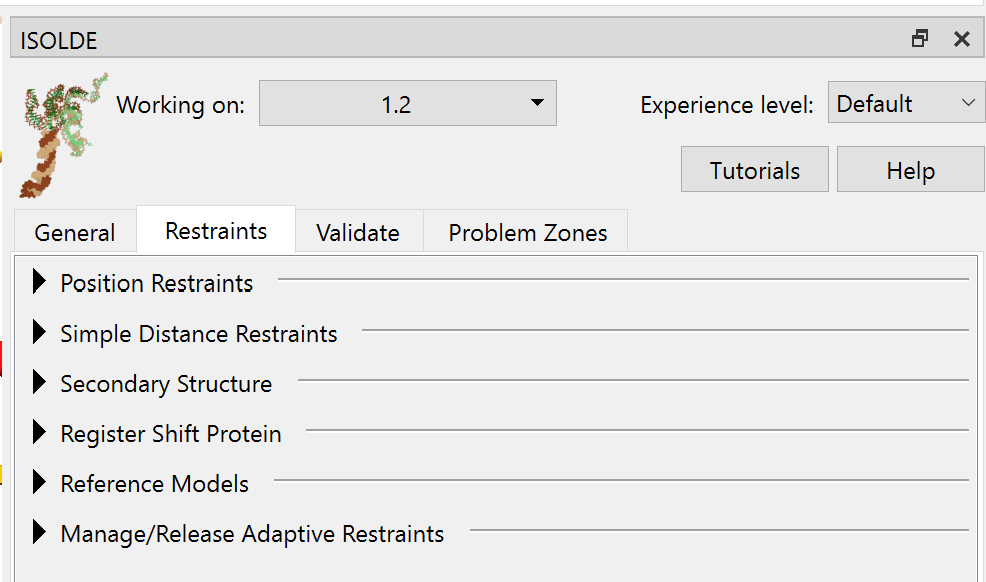
Position Restraints
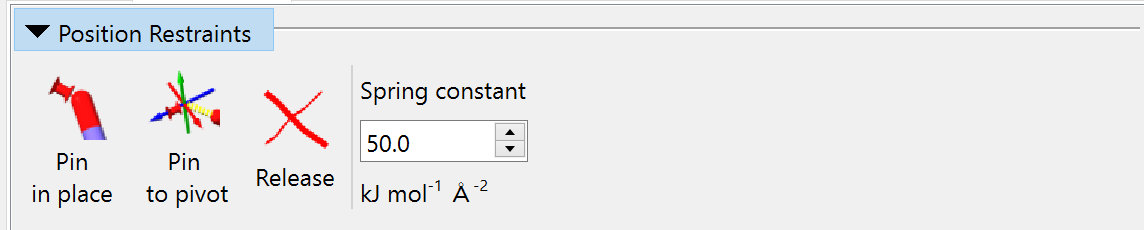
The three buttons in this widget allow you to, in order:
pin each heavy atom in the current selection to its current position;
pin a single heavy atom to the current position of the pivot indicator; and
release any existing position restraints on the current selection.
The applied restraint behaves for most purposes like a simple harmonic spring (that is, the applied force is proportional to distance), but transitions to a constant force at a maximum-force threshold to avoid instability. The spring constant for added restraints is set in the field on the right (changes affect only future restraints, not existing ones).
Simple Distance Restraints
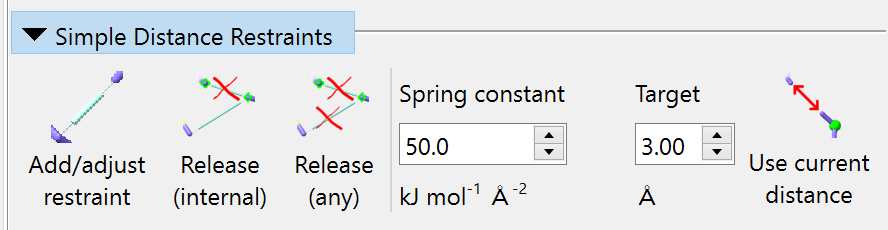
The first button is straightforward: it adds a harmonic distance restraint between two selected heavy atoms, with the target distance and spring constant defined by the relevant input fields. The “Release (internal)” button will release all distance restraints for which both endpoint atoms are currently selected. The “Release (any)” button releases distance restraints for which either endpoint atom is selected. Over on the right, the “Use current distance” button changes the “Target” field to the current distance between atoms when you have exactly two heavy atoms selected.
Simple distance restraints appear in the model as double-ended pistons:
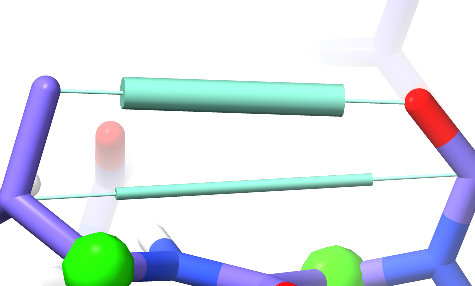
The length of the central cylinder indicates the target distance, while its thickness indicates the strength of the restraint.
Secondary Structure
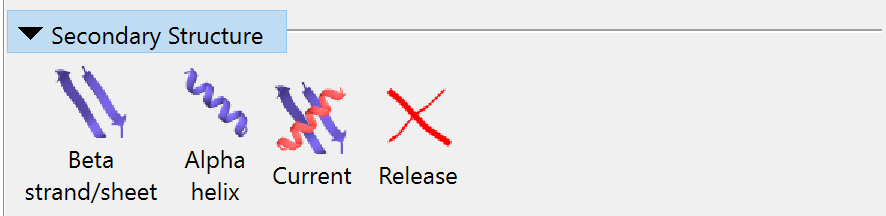
The first three buttons in this widget apply a combination of torsion and distance restraints to the current protein selection to guide the model towards your desired secondary structure. In brief:
the selection is broken into contiguous fragments;
within each fragment, torsion restraints are added to the phi and psi dihedrals, and distance restraints between each O-(N+4) and CA-(CA+2) pair, with target values matching the desired secondary structure;
for fragments assigned as beta strands, any backbone H-bonds to surrounding strands are reinforced by distance restraints.
The first two buttons simply set everything in the selection to beta strand or alpha helix respectively. The third assigns restraints based on the current secondary structure annotation. (NOTE: if this wasn’t defined in your input file, ChimeraX automatically assigns secondary structure using the DSSP algorithm. This is sometimes a bit over-enthusiastic in what it considers to be a helix or strand - so if you use this button you may find yourself subsequently needing to release quite a few residues.)
The final button will, of course, release all secondary structure restraints on the selected atoms.
Register Shift Protein
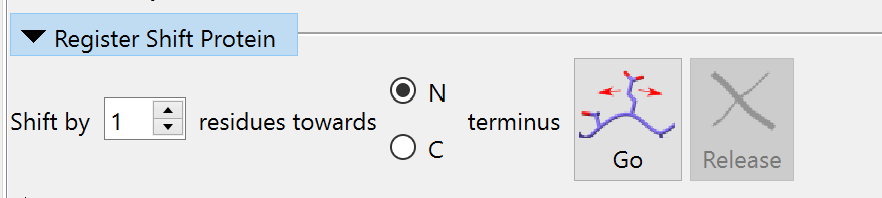
In models built into low-resolution maps (particularly older “legacy” models from the wwPDB) it is a reasonably common occurrence for part of the model sequence to get out of step with the map - that is, while the overall fold topology is correct, the wrong residue is at each site. The register shift tool is designed to help with that. Given a selection defining a single contiguous stretch of amino acid residues, it uses a set of moving position restraints on the N, CA, C and (where present) CB atoms to tug the backbone smoothly along splines fitted through these atoms’ initial positions, shifting them by the number of residue positions you request. Shifting in this way avoids having to deal with the tangle of sidechain-sidechain clashes that can be the result of other methods. Once the shift is done, clicking the Release button will remove the position restraints.
Reference Models
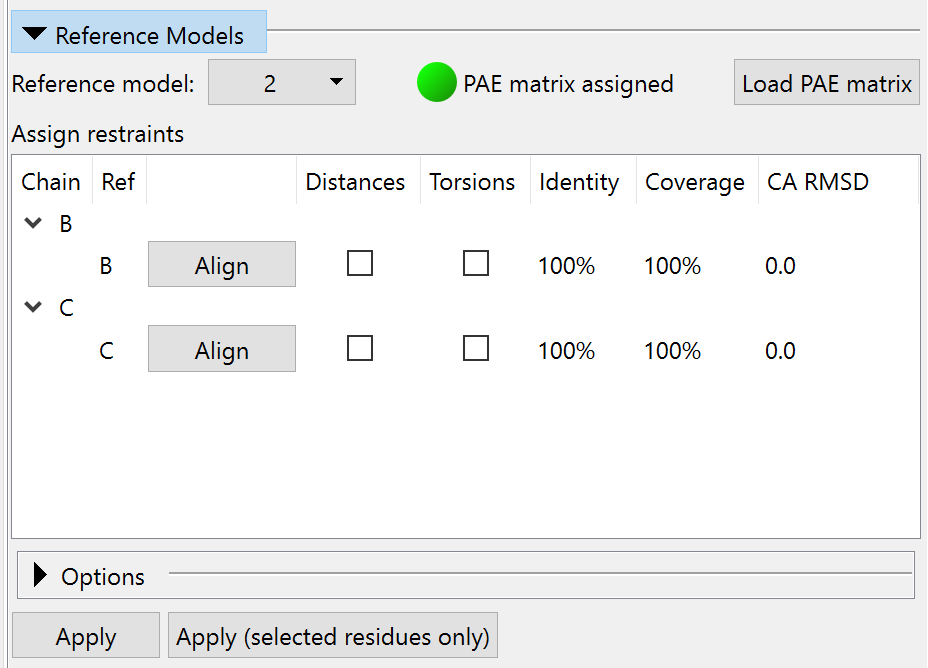
This widget allows you to use an existing model (experimental or predicted) as reference for the assignment of ISOLDE’s adaptive distance and torsion restraints.
After choosing a model in the “Reference model:” drop-down menu, the table below will automatically populate with possible matches between each chain in the working model and each chain in the reference model. The reference model (with colours shifted visually to distinguish it from the working model) will be aligned to the working model using MatchMaker. If the reference model was generated by AlphaFold2 (or any other prediction method that produces a Predicted Aligned Error (PAE) matrix in the same format), you can load that using the button at top right to enable confidence-based assignment of distance restraint parameters. (NOTE: to use a PAE matrix, the reference model must be the complete, unchanged prediction, with no residues added or removed.)
In the table, the “Chain” column will have an entry for each chain in your working model with at least one match (identity greater than 50%) in the reference model. Each potential match for that chain will be listed in the following rows, ordered by RMSD in the current alignment. The “Ref” column gives the chain ID of each refererence chain. The “Align” button allows you to re-align the reference model based on that (working chain):(reference chain) combination. The checkboxes in the “Distances” and “Torsion” columns allow you to specify this reference chain for the corresponding restraints (of course, you can only specify one reference chain for each working chain - while if you like you can choose different chains for torsion and distance restraints, but this is generally not a good idea). The final three columns provide important information about the relationship between working and reference chains: the fraction of the working sequence covered by the reference sequence; the sequence identity within that fraction; and the C-alpha RMSD in the current alignment. The Apply buttons below will create restraints based on the currently ticked checkboxes. The “Apply (selected residues only)” button, as the name suggests, will assign restraints only to those residues with atoms currently selected in the main ChimeraX window. (NOTE: once the restraints are assigned, they no longer rely on the reference model in any way. You can safely close it if you wish)
By default, when using a multi-chain model as reference, inter-chain distance restraints will be generated to maintain protein-protein interfaces. This can be disabled if desired via the Options widget (see below). Be sensible: this will only yield a reasonable result if each chosen reference chain has a low CA-RMSD in the current alignment. If the same chain is used as reference for two different working chains this option will be ignored, and inter-chain restraints will not be generated.
Options
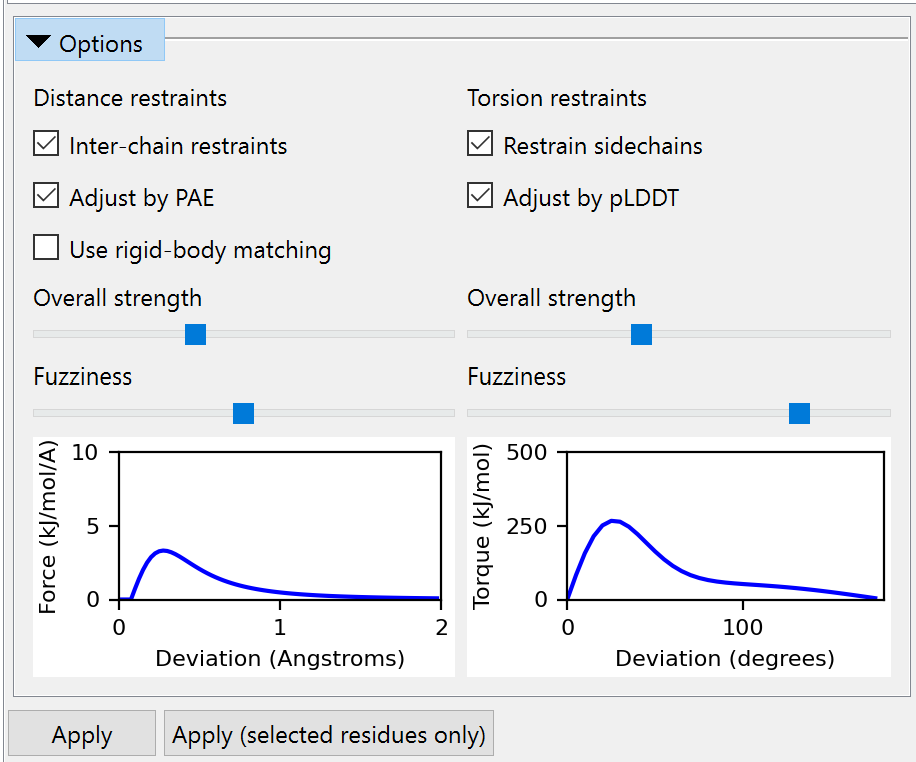
This sub-widget allows you to adjust the assignment behaviour and properties of reference restraints before you apply them. (NOTE: changes here do not affect any existing restraints.) The left-hand column is dedicated to distance restraints and the right to torsion restraints.
Distance restraints
Inter-chain restraints checkbox: if checked, restraints will be created across chain-chain interfaces if possible. Otherwise, only intra-chain restraints will be created.
Adjust by PAE checkbox: if checked and a valid PAE matrix has been assigned to the reference model, then the properties of each distance restraint will be adjusted according to the predicted aligned error between the residues containing the restrained atoms. See the isolde restrain distances command for more detals.
Use rigid-body matching checkbox: if checked, restraints will be applied only to those parts of the working model which make a good rigid-body match to the reference model. This is recommended if you are not using a PAE matrix. If unchecked, only the sequence alignment will be used for restraint assignment.
Overall strength and Fuzziness sliders: these allow you to adjust the overall strength of the restraints, and how quickly their applied force falls off with distance outside the harmonic region. The plot below gives you a preview of the resulting force profile for a restraint with a target distance of 3 Angstroms and a “perfect” PAE value of 0.2.
Torsion restraints
Restrain sidechain checkbox: uncheck this if you wish to restrain only the protein backbone, while leaving sidechains free to move.
Adjust by pLDDT checkbox: if checked, values in the B-factor column of the reference model will be subjected to a basic sanity check to make sure they look like pLDDT values (after some basic checks to see if (a) the values fall in the range 0..1 or 0..100, and (b) values are identical for all atoms in each residue, and (c) the median value for unstructured residues is lower than the median for helix/strand residues). If this check fails a warning will pop up suggesting you disable this option before continuing. Otherwise, the parameters for each torsion restraint will be adjusted based on the pLDDT for that residue. See the isolde restrain torsions command for more details.
Overall strength and Fuzziness sliders: these allow you to adjust the overall strength of the restraints, and how quickly their applied force falls off with angle deviation outside the harmonic region. The plot below gives you a preview of the resulting force profile for a restraint with pLDDT=100.
Manage/Release Adaptive Restraints
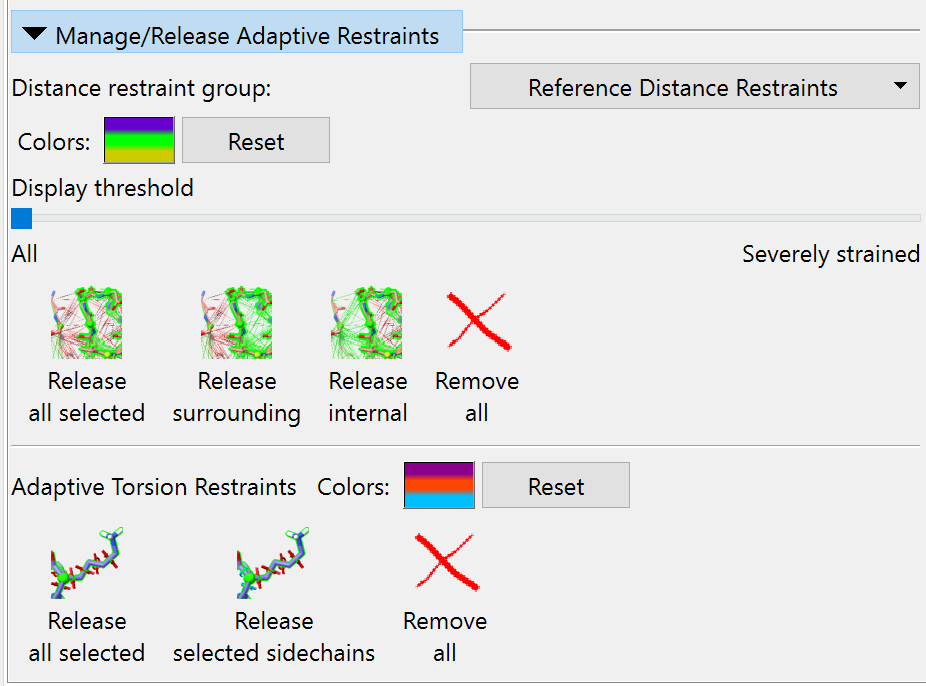
This widget allows you to selectively release adaptive distance and/or torsion
restraints added via the Reference Models widget or via the isolde restrain
commands. Additionally, here is where you can change their colour schemes to
your liking, and adjust the display threshold on distance restraints to show
only those restraints which are currently strained.
At present, the “Distance restraints group” drop-down menu is primarily a
future-proofing addition ahead of planned support for distance restraints from
other sources such as cross-linking/mass spectrometry experiments. If you really
wish to, you can use the isolde restrain distances command to create
multiple independent groups of reference-model difference restraints, but the
value of such an endeavour is unclear.
The “Colours” button displays the current colour scheme as three horizontal stripes, with the “overly compressed” colour at bottom, the “optimally satisfied” colour in the middle, and “overly stretched” at top. Clicking it will bring up a series of three colour chooser dialogues, allowing you to choose new colours in this order. The “Reset” button beside it resets the colour scheme to the stored defaults.
Dragging the “Display threshold” slider to the right will progressively hide the most satisfied distance restraints to cut down on visual clutter. When the slider is all the way to the left, all distance restraints will be shown.
The four buttons below this offer different options for releasing restraints with varying levels of selectivity. The “Release all selected” button will release all restraints for which at least one endpoint atom is selected. “Release surrounding” will release restraints with exactly one endpoint atom selected. “Release internal” will release only restraints with both endpoint atoms selected. Finally, the “Remove all” button will remove all restraints in this group.
The remaining buttons apply to torsion restraints. The “Colours” button here behaves analogously to the one for distance restraints; clicking it allows you to pick the colours for severely strained, moderately strained, and satisfied restraints in that order.
Unlike the distance restraint release buttons, the torsion restraint equivalents act on whole residues - every residue with at least one atom selected will be affected. As the names suggest, the buttons allow you to release either all restraints (phi, psi and chin) or only sidechain restraints (chin) on the selected residues, or to delete all adaptive torsion restraints in the model.